Wednesday, October 14, 2020

Mocha Chocolate Layer Cake


I know I've already included a chocolate cake recipe but this is an all around amazing and easy basic chocolate cake and who doesn't want more chocolate cake!  You don't need a mixer, only a bowl and a whisk (It is easier to make the frosting with a mixer however).  This is the one recipe that is always used when I'm making a birthday cake or cupcakes. It is based on an Ina Garten cake recipe (with slight changes) that has been a favourite for many bakers and is always rated 5 star.  It's so moist and light and wonderfully chocolaty and better yet, you can make it up to 2 days ahead.  

If you aren't a big coffee person, you can just use hot water but coffee really brings out the beautiful chocolate flavour without really tasting the coffee.  Honest!  


Cake is baked using a 6 inch pan with Swiss Meringue Buttercream (recipe not on this blog). Decorated by my daughter.


 Mocha Chocolate Layer Cake

                                                      Makes 2 layer 8 inch cake or 2 dozen cupcakes
Cake
1¾ c. all purpose flour
2 c. white sugar
¾ c. unsweetened cocoa powder (either regular or Dutch process)
2 tsp baking soda
1 tsp baking powder
½ tsp table salt
1 c. buttermilk*
½ c. vegetable oil
2 large eggs
1 tsp vanilla
1 c. hot coffee

Frosting
6 oz. semisweet or bittersweet chocolate, coarsely chopped
1 c. butter at room temperature
1 large egg yolk
1 tsp vanilla extract
1 c. icing sugar
1 Tbsp instant coffee granules or 1 tsp espresso powder (can be omitted)

  1. Cake:  Spray two 8 inch round cake pans well with vegetable spray and line with parchment paper.** 
  2. In a large bowl, whisk flour, sugar, cocoa powder, baking powder, baking soda and salt.  In another medium bowl, whisk the buttermilk, vegetable oil, eggs and vanilla.  Slowly whisk the wet mixture into the dry mixture until just mixed through.  Then add the hot coffee and whisk until well blended and no dry spots.
  3. Pour the batter into the prepared pans and bake for 30 to 35 minutes in a 350℉ oven.*** Or until a toothpick inserted into the centre of the cake comes out clean.  Let cool for 20 minutes and then invert onto cake rack.  Peel off parchment.
  4. Frosting:  In a microwave safe bowl, heat chocolate for 30 seconds and stir.  Keep doing 30 seconds and stir until melted.  
  5. In a bowl beat the butter, egg yolk, vanilla and icing sugar with mixer until well combined.  In small bowl, combine instant coffee with 1 Tbsp hot water.  Add this and the cooled chocolate mixture to the butter mixture and blend until uniform.
  6. For Icing:  Frost as desired using about ¼ to ⅓ of a cup for the middle of the cake and the rest for the top and sides.****  I sometimes like to put raspberry jam in the centre instead.  Refrigerate about an hour or up to 2 days before serving.

* or you can use ½ c. plain yogurt and ½ c. milk
** or you can place cupcake liners into 24 muffin tins
*** cupcakes will take about 20 minutes
**** for a birthday cake, I place one cake rounded side down (upside down) on the bottom and then put the frosting on and then place the other cake layer rounded side up. Finish frosting and decorate as desired.  However, for the unicorn cake, a flat top was required so either trim the dome or flip and put the flat top up.

Monday, September 28, 2020

Chocolate, Peanut Butter and Fudge Pie


This is such a great dessert to make.  It's very easy to put together, uses simple every day ingredients and can be made ahead of time.  A day or 2 ahead even!  This fudgy dream is a favourite of all ages and can look incredibly fancy if you want it to.  You don't even need to turn on the oven.  To make it one step easier, just buy the crust from the grocery store and no one will know. 


*My pie is made with gluten free crust (for a gluten sensitive person) with cornflakes and cocoa powder. 


  Chocolate, Peanut Butter and Fudge Pie


Chocolate Crumb Crust:
1½ c. Chocolate Oreo crumbs or graham wafers 
⅓ c. melted butter

Chocolate Fudge Filling:
4 ounces bittersweet or semisweet chocolate, chopped
½ c. heavy cream
1 tablespoon corn syrup

Peanut Butter Filling:
1 c. peanut butter smooth or crunchy
½ c. icing sugar
½ c. heavy cream
1 tsp vanilla

  1. For the crust:  Toss Oreo crumbs or graham wafers together with melted butter.  Press into a 9 inch pie plate.  Refrigerate 30 minutes or freeze 10 minutes until fairly firm.
  2. Fudge Filling:  Place all ingredients into a small bowl.  Microwave for 30 seconds.  Stir.  Continue microwaving in 10 second intervals and stir until melted and smooth.  Pour a small amount into a small sandwich bag (about ⅛ of a cup).  Set aside.  Pour the rest of the fudge filling onto the chilled crust.  Tilt pie plate to cover the bottom evenly.  Place back in freezer for 10 minutes.
  3. Peanut Butter Filling:  Place all ingredients into a mixer.  Beat until smooth.  Spread evenly on fudge filling.  
  4. Take the fudge filling that was set aside in the sandwich bag.  Snip a small hole (about and ⅛ of an inch) in one corner.  Spiral the chocolate around the pie.  To make the chevrons, run a knife from one side to the other alternating directions.*
  5. Refrigerate till well chilled.  At least 2 hours and up to 2 days ahead.
*Worried the pattern doesn't look nice?  Just shave some chocolate over top.  Voila, easy as pie.

Thursday, September 10, 2020

Chocolate Espresso Crunch Bars


It finally cooled down enough that I was able to retest a cookie recipe before I committed to a post.  It is a family favourite (I know, all of them seem to be family favourites but to be fair; I have many family members with different favourites).  This will be yours too if you love coffee, toffee and chocolate in a crunchewy bar.  Bake it a little longer if you prefer a crisper cookie or shorter for a softer chew.


 Chocolate Espresso Crunch Bars

2 c. all purpose flour
½ tsp. baking powder
¼ tsp. salt
1 c. butter, room temperature
1¼ c. packed brown sugar
2 Tbsp. instant espresso powder
½ tsp. vanilla
1 c. bittersweet chocolate chopped or semisweet chocolate chips

  1. Whisk flour, baking powder and salt together in a bowl.
  2. Beat butter and sugar in mixer till well blended and uniform.  Add espresso powder and vanilla.  Mix.  
  3. Slowly add flour mixture until just mixed.  Stir in chocolate.  This dough will be fairly thick.
  4. On an ungreased rimmed baking sheet (I use 10½ x 15½ size) press dough to corners as evenly as possible.*
  5. Bake in 325℉ oven for 18 to 24 minutes or until lightly browned and edges begin to crisp.  Turn sheet pan after 10 minutes for more even baking.
  6. Let cool or 1 or 2 minutes.  Cut into bars while still warm and then transfer to rack.  Let cool. They will crisp as they cool.
*If you use a larger pan, shape into a square about the right size.  11 x 15 square will take about the same time.  Longer time for crispier bars. 

Sunday, August 30, 2020

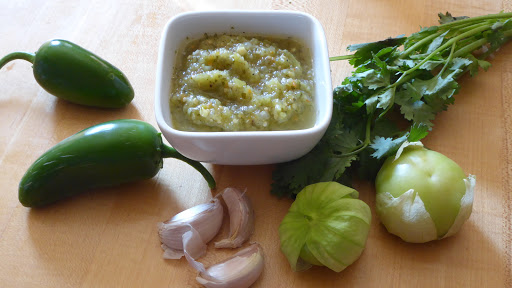
Roasted Tomatillo Salsa


I have a garden in the summer and grow a number of herbs and vegetables.  Tomatillos are one the unusual items and I so look forward to making salsa with them when they are ripe.

This recipe makes a wonderful tangy, spicy yet fresh Mexican style green salsa. It's easy to make and goes well with just about anything.

I've paired it with fish, burgers, falafels, eggs, pork chops and of course taco and fajitas.

Tomatillos are worth seeking out now that they are in season.


 Roasted Tomatillo Salsa

1½ lbs. fresh tomatillos (papery skins removed and rinsed)
3 or 4 fresh jalape帽os for spicy or (1 or 2 for mild)
3 garlic cloves unpeeled
½ c. fresh cilantro (stems and leaves)
1 large onion, chopped
2 tsp. coarse salt or 1 tsp table salt
  1. Place tomatillos, jalapenos, and garlic cloves on a foil lined baking sheet.
  2. Place under a broiler 2 inches from heat source.  Broil until soft and slightly charred.  About 7 to 9 minutes.*
  3. Remove skin from garlic.  
  4. Add all to food processor including cilantro, onion and salt.
  5. Process till slightly chunky.
  6. Enjoy!

* Alternately you can grill everything on the barbecue.

Sunday, August 16, 2020

Sweet Marie Bars

This wonderfully easy but delicious cookie bar recipe is a favourite for kids and adults alike.  Chocolate, peanut butter, nuts with that crunch of popped rice is a family favourite reminiscent of that no longer available but classic Canadian chocolate bar.  It's fast and easy and no bake.  Perfect for these hot days of summer when you want dessert but don't want the oven on. 

Go on give them a try.  Bask in the compliments.


Sweet Marie Bars

½ c. Peanut butter (regular or crunchy)
½ c. corn syrup
1¼ c. brown sugar
1 Tbsp. butter
3 c. Rice Krispies
½ c. chopped nuts
1½ c. semi sweet or bittersweet chocolate

  1. In a large microwave safe bowl, melt the peanut butter, corn syrup and brown sugar.  Mix 'til smooth.  Add Rice Krispies, butter and chopped nuts.  Mix well.
  2. Lightly press mixture into the bottom of a lightly greased 9" x 12" pan.
  3. Melt the chocolate in a bowl in the microwave starting for 1 minute then in 20 second increments.  Stir well after each session.  Spread over top of bar.
  4. Refrigerate until firm.
  5. Cut into bars and enjoy.

Sunday, July 26, 2020

Creamy No Churn Ice Cream

Yes, ice cream!  Everybody's favourite summertime dessert that can be made without an expensive, spacing taking ice cream maker.  The best part is you can make it any flavour you like.  The down side.. You do have to wait 4 to 5 hours to have it.  But think of the possibilities.....I tried chocolate with raspberry jam swirl, macha tea flavour, and our favourite cherry ribbon.

There's very few ingredients and actual prep time is minimal.  So get out your mixer and give it a try.


Cherry Ripple


Chocolate & Raspberry Jam Swirl


Creamy No Churn Ice Cream

1 can of sweetened condensed milk or 300 ml
2 tsp vanilla extract
¼ c whole milk (or 2%)
¼ c corn syrup
2 Tablespoons sugar
pinch of kosher or sea salt
2¼ cups heavy cream, cold
16 oz mashed frozen but slightly thawed cherries (so it's not one block)*

  1. In a medium bowl, whisk sweetened condensed milk, vanilla, milk, corn syrup, sugar and salt together till combined.  Set aside.
  2. In a large bowl, whip heavy cream until stiff peaks.  (When you lift the beater the cream peaks stay up and don't droop).
  3. Fold about 1 cup of the whipped cream into the condensed milk mixture till combined.  Then add this bowl into the whipped cream bowl and fold gently till even throughout.  Don't beat.  You're trying to keep the softness to keep the ice cream from being too hard.
  4. Fold in half of the cherries.
  5. Pour into a 9 x 5 x 3 inch loaf pan or 8 or 9 inch square pan or anything that hold about 8 cups.  (I use a pyrex glass dish because serving looks much nicer).  Gently place the rest of the cherries across top. If it is too soft you may have to let partially freeze (~30 min.) or everything will end up on the bottom of the dish.
  6. Place a piece of plastic wrap over the entire surface.
  7. Freeze for at least 5 to 6 hours.
  8. To serve, remove from the freezer about 20 to 30 minutes before to soften.
* If making chocolate raspberry swirl.  Decrease vanilla to 1 tsp. Omit cherries and add 6 oz of melted chocolate (either mix fully or swirl with ¼ cup of raspberry or strawberry jam)

Additional ideas:
Dark chocolate - Decrease vanilla to 1 tsp. and add 6 oz melted bittersweet chocolate and ½ tsp espresso powder

Peanut Butter Cup - Omit vanilla and add ½ c. peanut butter to condensed milk portion.  Gently stir in ½ c. chopped roasted peanuts.

Caramel Pecan - Swirl in ¼ c. caramel sauce and ½ c. chopped toasted pecans

Or Skor bits or mini rollos......

Be creative and enjoy your masterpiece.  It'll be delicious anyway you make it.

Monday, July 13, 2020

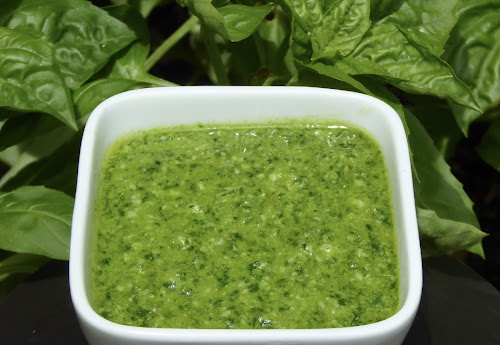
Easy Pesto

Summer is here which means fresh basil, one my favourite herbs to grow is ready to harvest.  Lovely to add to a salad or torn and sprinkled on Caprese Salad but my favourite thing to do with basil is make pesto.

It's fast and easy and all you need to do is throw all the ingredients into a food processor and 'voila' done.

Serve it on pasta, drizzled over garden fresh tomatoes, add it to mayo to make a sandwich spread, add a dollop to a salad dressing, as a dip with pizza..., so many uses. 

Oh, and if you don't have enough basil.  No problem.  Top up with fresh parsley.  Don't have that, try fresh spinach or arugula.  Of course the flavour will be different but it'll still be great.  

FYI.  Growing basil is really easy.  Buy those little containers of starter basil at your local nursery.  Plant them in at least a 5 litre container using Miracle-Gro potting mixture.  (It really makes a difference).  Place them in full sun and water them well when needed.  In a couple of months, you'll have the biggest basil plant ever.


Easy Pesto

3 c. packed fresh basil leaves
4 cloves garlic, roughly chopped
⅔ c. grated parmesan cheese
½ c. pine nuts
½ tsp. table salt
½ c. extra virgin olive oil
  1. In a food processor add all ingredients except olive oil.  Process till large leaves broken down.  Add olive oil and process till smooth.  30 sec.
  2. Use or refrigerate.  You can it in containers (I use those small plastic containers that pizza dip sauces come in when getting take out) or ice cube trays (pop them out after and place in bag).

Monday, June 29, 2020

Broccoli Slaw

It's gotten hot and baking has slowed down significantly.  Instead I offer this delicious salad recipe for the summer.  

Slaws are a great make ahead dish.  You can make them up earlier in the day and not worry about them sogging out.  I love a good cabbage slaw but this Broccoli Slaw is one of my favourites and it's very fast to put together.  A little creamy, a little sweet, great acid and wonderful crunch.  It's the best way to eat your broccoli.


Broccoli Slaw
                serves 6

1 head of broccoli
½ cup mayonnaise
4 tablespoons apple cider vinegar
1 tsp sugar
salt and pepper to taste
½ small red onion finely chopped
optional:
2 slices bacon cooked crisp and chopped
¼ cup sunflower seeds

  1. Wash and cut large stem off broccoli.  Cut off bottom and peel harder woody skin off stem.  Cut lengthwise into ¼ inch thin slices and chop small.  Cut head of broccoli into ½ inch planks and cut into smallish pieces.  Size is not really important but smallish, about the size of a thumbnail.
  2. In a large bowl whisk the mayo, vinegar and sugar.  Season with salt and pepper.  (4 or 5 grinds of pepper and a big pinch of salt). Add broccoli and onion.  Options can be added here as well.  
  3. Toss to coat.  This can be made ahead with options left out and added just before serving.


Tuesday, June 16, 2020

You Would Not Believe These Are Chocolate Beet Cupcakes

This is a wonderful chocolate cupcake recipe. Super chocolatey and moist with a lovely crumb.  Beets are finely grated and incorporated into the this beautiful silky batter.  It somehow lifts the chocolate to another level without even knowing the beets are there.  So yes, you can fool your kids or adult hating beets, into eating this without even realizing it.  (FYI, after i make or buy the cooked beets, I grate them and then measure out ¾ c into small bags and freeze it for my cupcake baking day.)

I was going to put the Chocolate Beet Cake (to come) and Cupcakes into one blog but explaining the two different ways of making them made my blog too difficult to follow, thus two different blogs for almost the same recipe.

These freeze really well so you can make them up ahead of time and for that birthday cupcake party, frost them that day or the day before. But beware.  This is a very fudgy frosting.  


You Would Not Believe These Are Chocolate Beet Cupcakes

                                     makes 24 cupcakes

For the Cake:
2 c. all purpose flour
⅔ c. cocoa powder*
1 tsp baking soda
½ tsp salt
¾ c. room temperature butter
1⅔ c. granulated sugar
2 large eggs, room temperature**
¾c. finely grated cooked and peeled beets
1 tsp vanilla extract
1¼ cups hot water

For the Ganache Frosting:
1 cup heavy cream
4.5 ounces dark chocolate 
(or little less than ¾ cup Chipits or chopped chocolate)

  1. For the Cupcakes:   Place muffin or cupcake liners into 24 muffin tins***.
  2. Sift together the flour, cocoa powder, baking soda and salt.  Set aside.
  3. In a stand mixer with the paddle attachment or hand mixer, beat the butter and sugar until light and fluffy, about 3 or 4 minutes.  
  4. Beat in the eggs one at a time until thoroughly combined.
  5. Mix in the grated beets and vanilla.  Slowly add half of the flour mixture and mix well.  Add the hot water and the rest of the flour (Go slowly or the hot water will spill out).  Mix on medium low once incorporated until smooth about 2 more minutes.  Scoop the batter evenly into pans.****
  6. Bake the cupcakes in  350℉ not on convection oven for about 23 minutes.***** Rotate the pans after 10 minutes, turning the cupcakes facing front to face back and then switch pans from left side of oven to right.  Start checking the cupcakes 5 minutes beforehand.  When a toothpick inserted in the centre of the cupcakes comes out clean, it is done.
  7. Let them cool for 10 minutes and then remove from the pan and place on wire rack.  Let cool completely.
  8. For the Ganache Frosting:  In a small saucepan over medium heat, pour in heavy cream.  Just bring to boil.  Remove from heat immediately and add chocolate.  Stir until completely melted.  Let fully cool.  About an hour. It shouldn't be runny but not too set.  Like the texture of soft butter.
  9. When set you can use as is and spread over tops of cupcakes or if you want  to make that extra effort, place the frosting into a bowl and using the whisk attachment, beat until fluffy.  
  10. Using a knife, carefully and lovingly swirl over the cupcakes.  (I use as is or a piping bag for an added oomph but be aware this takes a lot more frosting than this recipes makes for all the cupcakes.)

* Either Dutch Process or regular cocoa powder.  Dutch Process will be a darker chocolate flavour and colour.

**If you forgot to take the eggs out, no problem. Put them in a bowl with warm water for about 5 minutes or hot water for less.  Just not hot enough to boil them.


***The cupcake liners make a big difference in presentation.  The cupcakes rise much higher than directly in a muffin tin.

****If you don't have a cookie dough scoop with a sweeping arm and you make muffins on occasion, it's worth purchasing one. Whatever size, make sure you evenly disperse batter.

*****I almost always bake on convection but I find especially with cupcakes that the convection oven makes the tops dome weirdly.


Thursday, May 28, 2020

Oatmeal Coconut Cookies

In these days of physical distancing and self isolation, I have done a lot of baking and when I can, have shared my bounty.  I find I have favourites that I make over and over.  My family love them but I didn't feel they were good enough for my blog.  

Well, I guess I was wrong.  These cookies were really enjoyed by a good friend and her family.  She wanted the recipe.  These Oatmeal Coconut Cookies are the right balance of crunchewieness, little sweet but not too much.  As an extra when the mood is right, they are great sandwiched with vanilla ice cream. 馃構  
Here you go Mary.


Oatmeal Coconut Cookies
                                                           this make a lot, ~4 dozen

1 cup butter
¾ cup white sugar
½ cup brown sugar
1 egg
1 cup all purpose flour
2 cups quick cooking oats
¾ cup unsweetened or sweetened shredded coconut
1 tsp baking powder
1 tsp baking soda
¼ tsp salt
optional:
 ½ cup raisins (cut coconut to ½ cup)
  1. In a stand mixer, beat butter and both brown and white sugar.  Add egg and cream well.
  2. Turn off mixer and then add rest of the ingredients into the bowl trying to distribute the ingredients over the whole bowl.  Mix well.
  3. Drop by tablespoons onto parchment lined baking sheet about 2 inches apart.
  4. Bake in 350℉ oven for 12 to 15 minutes or until nicely browned around the edges.
  5. Let cool slightly and place on wire rack to cool completely.


Monday, May 11, 2020

Fast and Easy Pizza Dough


I use this pizza dough recipe all the time.  It only takes 5 minutes to put together in the food processor from start to finish.  You can also use a stand mixer, bread maker or just a bowl and arm strength.  

You can use this dough the same day but even better is letting it rest overnight in the refrigerator.  This dough can also be frozen.

I often change the flour to make it a little more healthy.  I use 3½ c all purpose flour to ½ c whole wheat flour.  Either way this dough is very versatile.


Fast and Easy Pizza Dough
Makes 1¾ lb dough or 4 - 8 inch pizzas

4 cups all purpose flour
2 tsp instant yeast or active dry yeast*
1½ tsp salt
1½ cups room temperature water
2 tablespoons olive oil

  1. Place flour, salt and yeast into a food processor.  Pulse to mix.  Add olive oil to water then add mixture into processor.  Pulse until mixture comes together into a ball.  It should only take 12 to 15 quick pulses.  Dump mixture onto a lightly floured surface.  If there's still flour don't worry.  Knead the mixture together until uniform.  Try not to add too much flour.  Sticky dough is okay. Shape into a ball.
  2. Pizza for tonight:  Divide the dough into 4 equal pieces and roll into smooth ball.  With cooking oil spray (PAM or equivalent), lightly spray a tray and cover with another tray or plastic wrap and let rise until double.  (30 to 45 minutes.  It will take a little longer with active dry yeast 45 to 60 minutes).  Continue with your favourite pizza recipe.
  3. Pizza for tomorrow:  You can do the same as above and place the whole tray into the refrigerator or if you're like me and don't have that much room, lightly spray 8 cup bowl and place dough inside.  Cover and place in fridge overnight.  Take out of the fridge half an hour before you want to use.  Gently pull dough out and cut into 4 pieces.  Try not to push out the air bubbles while gently making ball.  Cover and let rest.  Continue with your favourite pizza recipe.
  4. Pizza for next week:  In a large zip lock bag, lightly spray inside with cooking oil and place pizza dough inside.  You can freeze for a month or two.  When ready to use, transfer dough from freezer to fridge and let thaw for at least 12 hours so you'll want to do this the night before you plan to make pizza.  If you forget, don't panic.  You can let them defrost on the counter and it will still be fine.  
*If you aren't sure if your yeast is usable you can check it before making your dough. Instead of putting the yeast into the flour mixture, put the 2 tsp of yeast into 1½ cups warm water (body temperature) and letting it sit until it foams (5 to 10 minutes).  If it does nothing, discard and get fresher yeast. If it foams, continue with the recipe by adding olive oil and then adding to the food processor.


Pizza Making Tips
  1. A tip to those new to at home pizza making.  I find rolling the dough out on parchment makes the dough much easier to handle.  Sprinkle the parchment with a little cornmeal or flour first. If you like it very thin and it keeps springing back, let the dough rest for 5 minutes and then try again.  Place pizza, parchment and all on baking sheet or directly on stone.
  2. The parchment can be removed after a few minutes in the oven.  
  3. Preheat the oven to at least 450℉.  If you are using a baking stone (which makes awesome pizza by the way) make sure the stone is heated for at least 30 minutes before placing the pizza on it. 
For Wendy.  Enjoy!

Wednesday, April 15, 2020

Easy Cheesecake Squares

Everyone needs a good cheesecake recipe.  I've tried many recipes but found that 4 blocks of cream cheese and springform pans are fine when you need dessert for 12 people but really, how often does that occur?  I have the easiest baked cheesecake recipe.  It's light and fluffy and not overly sweet.  You can have it either as a chocolate or vanilla filling.  You can make the crust with chocolate Oreo crumbs or regular graham wafers.  You can serve whatever toppings you want or happen to have on hand at the time.  The beauty of this recipe is it can be made ahead and refrigerated for days or frozen for months ahead of time.  Just pull out when you need it.


Easy Cheesecake Squares


Easy Cheesecake Squares
                     
Crust
1½ c. graham wafer crumbs or oreo chocolate crumbs
⅓ c. butter, melted

Cheesecake
1 bar (8 oz) cream cheese
1 c. sour cream
1 tablespoon cornstarch
½ c. white sugar
2 large eggs
1 teaspoon vanilla

Chocolate Cheesecake version : add ⅓ c. cocoa (either regular or Dutch
                                                    Process) and increase sugar to ¾ c.

Topping of your choice:  strawberries, blueberries, jam, chocolate ganache (as shown), crumbled Oreos, lemon curd are a few suggestions

  1. In an 8 inch square pan, line the bottom with parchment paper.
  2. For crust:  Melt butter in medium bowl.  Add crumbs and stir to combine.  Pour into prepared pan and press evenly over the bottom.
  3. For cheesecake:  In mix master or food processor, blend cream cheese and sour cream until smooth.  Add rest of ingredients and blend again until well combined.
  4. Pour onto crust and spread evenly.  Lift the pan up a few inches with both hands and drop onto counter (Assuming its not glass!  If it is use a towel under it).  Do this again.  This helps remove any large bubbles from the batter.
  5. Bake at 325℉ for 35 to 40 minutes.  Test with a toothpick.  If it comes out clean, it's done then remove from oven.  If there is wet dough attached, leave in the oven a few minutes longer and test again.  Let cool and put into refrigerator for at least 1 hour.  You can do this ahead and leave it in the refrigerator for up to 2 days.
  6. Slice and add your choice of toppings.


Friday, April 3, 2020

Dulce de Leche Creme Br没l茅e

Before you go any further...yes, this is a recipe for the instant pot.  If you don't have one then this recipe is not for you.  I had a request to include this recipe in my blog.  It has been devoured by everyone who has tried it and is often requested.  This recipe really only takes minutes to put together and can be made ahead.  The only complaint I've had is that the portions should be larger.  Be prepared to have company wanting to lick the jar clean.

Dulce De Leche Creme Br没l茅e


Dulce De Leche Creme Br没l茅e
                                                                                                 makes 6
1 large egg
2 egg yolks
½ c. dulce de leche
1¼ c. heavy cream (35%)
1 tsp vanilla extract
¼ tsp kosher salt or pinch regular salt


  1. In a 4 cup measuring cup or medium bowl, whisk together the egg, yolks, dulce de leche until well combined.  Whisk in the cream, vanilla and salt.
  2. Evenly portion the batter into 6 small canning jars (125 ml).  It should fill just to the line ½ inch from the top .  Loosely screw the lids on.  You don't want it tight.
  3. Pour 1½ c. of water into the bottom of the instant pot or what ever your manufacturer recommends.  Place the trivet in the pot and carefully set the jars on top.  In mine, five fit around the circumference with one in the middle.  You may have to adjust depending on the size of your pot.
  4. Secure the lid and set the machine on high for 3 minutes or if your pot is like mine after 3 minutes hit cancel and let naturally release for 15 minutes.  Depressurize the pot and open the lid.  Let cool.  Carefully remove jars and let them come to room temperature.  Place them in fridge for at least 2 hours.  You can also freeze them, pull them out when you need them and leave them overnight in fridge or a few hours at room temperature.  
  5. When ready to serve.  Remove lid.  Lightly dab top of the creme br没l茅e with paper towel to remove any condensation. Evenly sprinkle with about a half teaspoon of white sugar and use torch to caramelize the sugar. If you don't have a torch, don't worry: Just serve it as is (just no br没l茅e) or with fruit and whip cream.  It'll still be delicious.
For you Anna!